
Explore the Magic of No-Sew Bookbinding: Create Your Own Masterpiece

In closing out our September crafty DIY theme dedicated to bookbinding, it's important to acknowledge and extend gratitude to those who have been instrumental in our journey. Special thanks to Kelly of Odette Press, whose patient instruction on the pamphlet stitch at the Brooklyn Brainery was instrumental in my learning process. Additionally, I must credit Sea Lemon, the talented YouTube educator, whose tutorials on Coptic Stitching have been a source of inspiration for many years.
Now, if you're enthusiastic about delving into the enchanting world of bookbinding but find yourself a tad apprehensive about mastering intricate stitches and sewing techniques, fret not! We're thrilled to introduce you to a delightful alternative: the world of no-sew bookbinding. This technique offers an extraordinary avenue for crafting exquisite, handmade books, all without the necessity of sewing skills. Whether you're a seasoned crafting aficionado or a complete novice seeking a creative outlet, this approach unlocks a realm of endless possibilities.
Why Choose No-Sew Bookbinding?
1. Beginner-Friendly: No-sew bookbinding is incredibly accessible, making it perfect for those new to bookbinding or crafting in general. You won't need any special tools or sewing equipment, making it easy to get started.
2. Quick and Convenient: Traditional sewn bindings can be time-consuming and require precision. No-sew bookbinding, on the other hand, allows you to create stunning books more quickly, giving you instant satisfaction.
3. Endless Creativity: Despite its simplicity, no-sew bookbinding offers endless opportunities for creativity. You can experiment with various materials, sizes, and designs to produce unique and personalized books.
Materials You'll Need
Before diving into the process, gather the following materials:
- Sheets of paper: Decide on the size and type of paper you want to use for your book's pages. You can choose from plain, lined, or even specialty papers like watercolor or sketch paper.
- Cardstock or cardboard: Chipboard will serve as your book's covers. You can use decorative paper to cover them for added flair.
- Binder clips or bulldog clips: These clips will help hold your pages and covers together while the glue dries.
- Glue: Opt for a high-quality, acid-free glue to ensure the longevity of your book. We use this brand.
- Bone folder or spoon: Bone folder will help smooth out any wrinkles and ensure a firm bond between the pages and covers.

No-Sew Bookbinding in Simple Steps
1. Prepare Your Pages:
- Cut your sheets of paper to the desired size for your book's pages.
- Stack them together and ensure they are evenly aligned.

2. Create the Cover:
- Cut your cardstock or cardboard to the same size as your pages.
- If desired, cover the covers with decorative paper or fabric.
3. Bind the pages to the cover.
Three different ways to bind a book without sewing:
(1) Glue the Pages:
Apply a thin, even layer of glue along the spine edge of your stacked pages.
Press the glued edge onto the spine of your cover, making sure it's aligned.
Use binder clips or bulldog clips to hold the book together while the glue dries. Let it dry for at least a few hours or overnight.
Once the glue is completely dry, use a bone folder or spoon to smooth the spine and ensure a secure bond.

Tip: Wrap chipboard with wax paper or plastic wrap to glue the signatures together and hold with binder clips.
(2) Use elastic or ribbon:
Put the elastic around the spine and insert the signatures to each elastic.
Tie the signatures to the spine with ribbons.

(3) Hinges:
Use tape to create hinges.
On the cover place 3 pieces of tape at the top, center, and the bottom

1st signature place 2 pieces of tape to lay in between the 3 pieces of tape from the book cover.

Close the tape of the cover onto the 1st signature.

2nd signature place 3 pieces of tape at the top, center, and the bottom.

Close the tape of the 1st signature onto the 2nd signature.
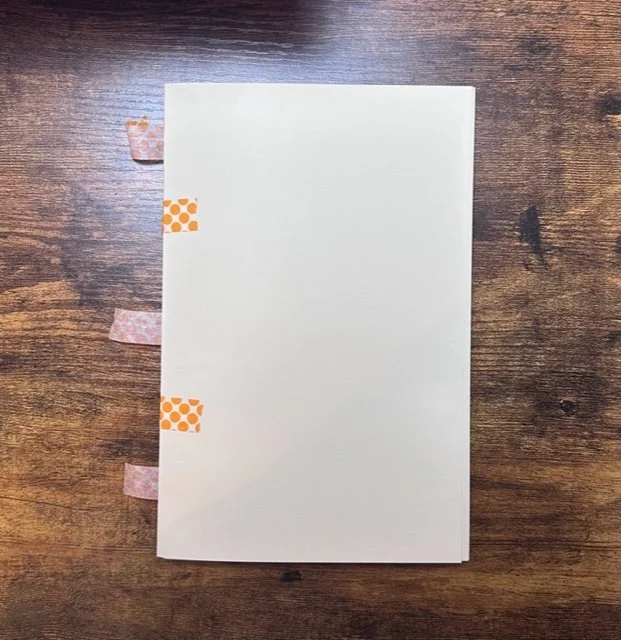
Repeat until you have reached the cover.

4. Personalize Your Creation:
- Let your creativity flow! Decorate your cover, add a title, or embellish the pages to make your book uniquely yours.
Embrace the Art of No-Sew Bookbinding
No-sew bookbinding is a delightful way to express your creativity, make personalized gifts, or simply relax and dabble in a new craft. With a little practice, you can create stunning handmade books that are as beautiful as they are functional. So, gather your materials, let your imagination run wild, and embark on your no-sew bookbinding journey.
Happy crafting!
Laurie & Bex
Have you tried no-sew bookbinding before? Share your creations and tips with us in the comments below!
Disclosure: Some of the links in this post are affiliate links, meaning, at no additional cost to you, I will earn a commission if you click through and make a purchase.